setting techniques-
Shower pan construction:
Each custom built shower pan I install using standard drain size and curb construction is
guaranteed not to leak or I will repair it free. period. This is because my method and materials really
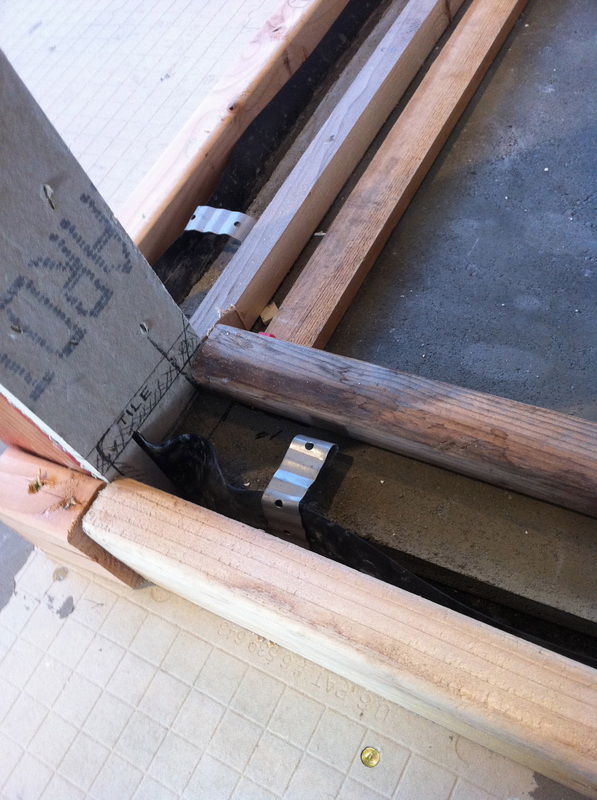
cant leak. I offer two types of construction. 1st poured concrete pans, with pre floats, and with a PVC pan liner, then final pour, concrete board on walls, a poured curb ( curb is solid concrete with NO lumber inside which could expand/contract with the seasons ) with liner inside and past the glass door, see photo, then all seams muded and the entire surface painted with two coats of hydroban, an elastomeric waterproofing coating. This keeps the concrete pan dry, and a dry pan is a happy pan, free of moisture, mildew, mold, and odors.
2nd is a WEDI system shower with WEDI componets. see WEDI site or ask me for more details on this system.
(PHOTO: shows curbs formed up with PVC liner visible and ready for the pour) For more
detailed info on my pan construction, please send me an email...
Note: level entry pans (no curb) and lineal drains can create more problematic drain situations
Setting tile:
Setting todays popular large format porcelain tiles requires some special techniques.
Good 'Bond' to the floor with the mortar is the first concern. Ive seen several large
tile floor jobs fail to 'bad bond' where tiles pop loose after some time, usually with the
help of a little 'deflection' or movement with foot traffic. This can be helped with a good
bond from tile to floor, and the best way to achieve this is to apply mortar to the floor
AND to the back of each tile, one at a time, with a notched trowell, then place the tile
into the floor mortar. This can be called backbuttering, but if done with a notched trowell
you insure the best bond possible ,as simply speading some mortar to the tiles back or
'doting' some globs on the tiles back will not. In fact the 'dot' method creates air pockets that leave weak spots. This is why I set
each tile after coating its back with a notched trowell using thinset mortar. Not mastic. No dots. This method also helps to keep
the surface of the tiles (corners) smooth, with minimal lippage, or high corners.
Each custom built shower pan I install using standard drain size and curb construction is
guaranteed not to leak or I will repair it free. period. This is because my method and materials really
cant leak. I offer two types of construction. 1st poured concrete pans, with pre floats, and with a PVC pan liner, then final pour, concrete board on walls, a poured curb ( curb is solid concrete with NO lumber inside which could expand/contract with the seasons ) with liner inside and past the glass door, see photo, then all seams muded and the entire surface painted with two coats of hydroban, an elastomeric waterproofing coating. This keeps the concrete pan dry, and a dry pan is a happy pan, free of moisture, mildew, mold, and odors.
2nd is a WEDI system shower with WEDI componets. see WEDI site or ask me for more details on this system.
(PHOTO: shows curbs formed up with PVC liner visible and ready for the pour) For more
detailed info on my pan construction, please send me an email...
Note: level entry pans (no curb) and lineal drains can create more problematic drain situations
Setting tile:
Setting todays popular large format porcelain tiles requires some special techniques.
Good 'Bond' to the floor with the mortar is the first concern. Ive seen several large
tile floor jobs fail to 'bad bond' where tiles pop loose after some time, usually with the
help of a little 'deflection' or movement with foot traffic. This can be helped with a good
bond from tile to floor, and the best way to achieve this is to apply mortar to the floor
AND to the back of each tile, one at a time, with a notched trowell, then place the tile
into the floor mortar. This can be called backbuttering, but if done with a notched trowell
you insure the best bond possible ,as simply speading some mortar to the tiles back or
'doting' some globs on the tiles back will not. In fact the 'dot' method creates air pockets that leave weak spots. This is why I set
each tile after coating its back with a notched trowell using thinset mortar. Not mastic. No dots. This method also helps to keep
the surface of the tiles (corners) smooth, with minimal lippage, or high corners.